Saturday, May 18, 2013

Shabooya + Science

It's been a while!  We don't need to go over the details.  Let's just jump into a quick and easy lesson I did with a great result of student work to display and reference at the end of a unit.

Quite often, I start off my science units having the kids write one question about it on a sticky note.  We then read our questions to the class and poll the students: Is it testable in the classroom, or do we need to research it?  Then, the sticky note goes in the correct column.

I jazzed it up by having the kids ask their question in "Shabooyah" form:

http://www.youtube.com/watch?v=qImdxtdJ32Y

They say, "My name is ___________," and we say, "YEAH???" and then they say,  "I have a question," and we say, "YEAH???" and then they read the question instead of interesting facts about themselves as the cast of the office does in the above video.

This unit was about ROCKS.  Woohoo!  I decided to do something

NEW!

DIFFERENT!

SLIGHTLY HIGHER LEVEL OF THINKING ACCORDING TO OUR FRIEND BLOOM!

They Shabooya'd their questions, but didn't take a vote.  They just put it up on the chart.  THEN, we came up with our OWN categories afterward!

Some questions were about the history of rocks: How did they get their name?  Who discovered the first rocks?  You can read the rest of the categories and see the questions more easily if you click on the pictures.


The final product!


It used to be that you could just throw up a cute title and some work on a bulletin board, but now you have to add an exemplar and the objective.  Less time-consuming than I thought, and actually it's pretty valuable.  Thanks, EEF!


Exemplar


I love Post-It chart paper (accepting donations now!) but I always rip it when I tear it off.


Originally, I put this question under the "Tests to Perform in Class" category, but thought twice since this particular inquiry would come back to haunt me at the unit's end.
I teach a number of FLEPs that maybe shouldn't have been FLEPed.


I recommend these simple Total Participation Techniques (sorting) and Bloom's levels (categorizing and inquiring) for any KWL-type unit intro!

Saturday, November 3, 2012

Memory Books and Jars

Well, hello!  It's been a while.  I got a new job and feel like I'm a first year teacher again.  I'm still teaching 4th grade, but that is about the only thing that is the same as my old job.  Luckily, I have been getting a slightly better handle on my free time, and am ready to post this "tutorial" I did over the summer.

I decided to find all of my keep sakes and organize them.  I saw these two ideas on Pinterest but cannot find the original sources!  So my disclaimer is that it's not my idea, just my step-by-step directions and pictures to organize your keepsakes!

You'll need a large mason jar or two, and some cute three ring binders with sheet protectors and dividers- enough to hold as many notes you want to keep!


First, I found a place to store all the big stuff: My May Day crown from college (that's right, I was the queen), an old picture from one of those cheesy picture-sketch booths, and other things too big for a jar or notebook.  I put them in a large bag from Guatemala that I can't bear to get rid of but won't really use.  A keepsake holding a keepsake.


Then, I got all my paper goods and organized them.


I put personal stuff, like notes from family members and cards from friends, into piles by size and put them aside.  Then, I separated the kid stuff into cards they made, notes/cards from co-workers, and notes/cards from their parents.  I then put these into size sub-categories because I am a loser.  Some things did get thrown away.  You don't need to keep the half-sheet of notebook paper that a kid drew a smiley face on in highlighter.  Especially if that kid gave one to you every day and you kept all of them.

As I organized, I found some things that wouldn't fit so easily into a page protector, so I made two memory jars: One for life, and one for just boyfriend memories (awwwwwww).  I knew I was a true Bostonian when I had to separate my Red Sox tickets into those two groups.


BF Jar


Voila!


My life jar includes my Hogwarts patch, my first Red Sox tickets, my first Relay for Life bracelet, and other excellent things.


Jar twins


Now, get a notebook and a stack of sheet protectors and place them in the rings.


Start putting in the cards that are the easiest ones to fit!


Soon, you'll have tons of pages of memories.  Unfortunately, you may run into a problem.


Some cards just won't fit.
Perform some surgery.


Put the two halves next to each other in the binder!

I also found that many of my students made me "3-D" cards, but my notebooks came with little clipboards inside, so I didn't have to smush their hard work.
For some cards, I wanted the front and back to be seen in one sheet protector, but others could be easily layered.

Front

Back


I layered a card from one person on the blank space of another.


Eventually, I finished up the kid stuff and moved on to family/friends.  I made separate piles again.  One was old stuff, people I don't even keep it close touch with but still made an impact (or cracked me up):

15th birthday card from lunch friends

No words...

9th grade

My next category was stuff from one of my dearest friends in the whole wide world, my since-8th-grade BFF.


I also had a Mom category, Dad category, a category for one of my aunts, my sister... categories are really important.  What a great example to give my students about the importance of scientific classification!

I really don't think they will give a crap about my keepsake books.  Never mind.

So fill up your binders with cards!


My memory holders


Make sure you leave room for all of the memories to come!


Tuesday, June 26, 2012

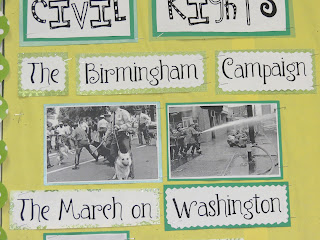
Civil Rights Unit Word Wall

My cherubs had a lot of trouble understanding the Civil Rights Movement.  Among a few other resources, I found pictures to be most effective to add to the unit we did.  They showed the students that in fact, these events did happen.  They had a hard time believing people could do such terrible things.  It was also good to include successes!  SO!  Instead of a mere word wall, I made a picture word wall!  I'm not a huge fan of plain word walls.  I think definitions or an image should join the words.  Here is my Civil Rights Word Wall:


Google the word, phrase, or event you need and search the images.  Aim for pictures that are at least 500x600 so your pictures are basically the same size and you won't need to re-size.  Obviously, I wasn't able to do that here, so just do your best!


Click on images to expand.


Wednesday, May 30, 2012

Tall Tales Unit Bulletin Board

We are wrapping up our unit on Tall Tales.  The kids read them in small groups, as a whole class, did graphic organizers, reading responses, and now they are writing their own!

Here are the pictures of my bulletin board: