Saturday, November 3, 2012

Memory Books and Jars

Well, hello!  It's been a while.  I got a new job and feel like I'm a first year teacher again.  I'm still teaching 4th grade, but that is about the only thing that is the same as my old job.  Luckily, I have been getting a slightly better handle on my free time, and am ready to post this "tutorial" I did over the summer.

I decided to find all of my keep sakes and organize them.  I saw these two ideas on Pinterest but cannot find the original sources!  So my disclaimer is that it's not my idea, just my step-by-step directions and pictures to organize your keepsakes!

You'll need a large mason jar or two, and some cute three ring binders with sheet protectors and dividers- enough to hold as many notes you want to keep!


First, I found a place to store all the big stuff: My May Day crown from college (that's right, I was the queen), an old picture from one of those cheesy picture-sketch booths, and other things too big for a jar or notebook.  I put them in a large bag from Guatemala that I can't bear to get rid of but won't really use.  A keepsake holding a keepsake.


Then, I got all my paper goods and organized them.


I put personal stuff, like notes from family members and cards from friends, into piles by size and put them aside.  Then, I separated the kid stuff into cards they made, notes/cards from co-workers, and notes/cards from their parents.  I then put these into size sub-categories because I am a loser.  Some things did get thrown away.  You don't need to keep the half-sheet of notebook paper that a kid drew a smiley face on in highlighter.  Especially if that kid gave one to you every day and you kept all of them.

As I organized, I found some things that wouldn't fit so easily into a page protector, so I made two memory jars: One for life, and one for just boyfriend memories (awwwwwww).  I knew I was a true Bostonian when I had to separate my Red Sox tickets into those two groups.


BF Jar


Voila!


My life jar includes my Hogwarts patch, my first Red Sox tickets, my first Relay for Life bracelet, and other excellent things.


Jar twins


Now, get a notebook and a stack of sheet protectors and place them in the rings.


Start putting in the cards that are the easiest ones to fit!


Soon, you'll have tons of pages of memories.  Unfortunately, you may run into a problem.


Some cards just won't fit.
Perform some surgery.


Put the two halves next to each other in the binder!

I also found that many of my students made me "3-D" cards, but my notebooks came with little clipboards inside, so I didn't have to smush their hard work.
For some cards, I wanted the front and back to be seen in one sheet protector, but others could be easily layered.

Front

Back


I layered a card from one person on the blank space of another.


Eventually, I finished up the kid stuff and moved on to family/friends.  I made separate piles again.  One was old stuff, people I don't even keep it close touch with but still made an impact (or cracked me up):

15th birthday card from lunch friends

No words...

9th grade

My next category was stuff from one of my dearest friends in the whole wide world, my since-8th-grade BFF.


I also had a Mom category, Dad category, a category for one of my aunts, my sister... categories are really important.  What a great example to give my students about the importance of scientific classification!

I really don't think they will give a crap about my keepsake books.  Never mind.

So fill up your binders with cards!


My memory holders


Make sure you leave room for all of the memories to come!


Tuesday, June 26, 2012

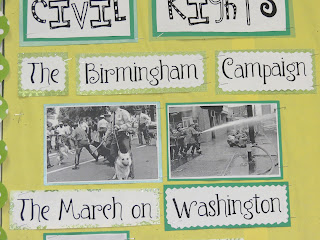
Civil Rights Unit Word Wall

My cherubs had a lot of trouble understanding the Civil Rights Movement.  Among a few other resources, I found pictures to be most effective to add to the unit we did.  They showed the students that in fact, these events did happen.  They had a hard time believing people could do such terrible things.  It was also good to include successes!  SO!  Instead of a mere word wall, I made a picture word wall!  I'm not a huge fan of plain word walls.  I think definitions or an image should join the words.  Here is my Civil Rights Word Wall:


Google the word, phrase, or event you need and search the images.  Aim for pictures that are at least 500x600 so your pictures are basically the same size and you won't need to re-size.  Obviously, I wasn't able to do that here, so just do your best!


Click on images to expand.


Wednesday, May 30, 2012

Tall Tales Unit Bulletin Board

We are wrapping up our unit on Tall Tales.  The kids read them in small groups, as a whole class, did graphic organizers, reading responses, and now they are writing their own!

Here are the pictures of my bulletin board:


Monday, May 28, 2012

Tray Re-Do

Here's a craft that has nothing to do with school.  Happy Memorial Day!

Before:


After:


You'll need a paint scraper, the acrylic paint colors of your choosing, and Mod Podge.  I also needed a little sanding block.

I'm not super pleased with how the design turned out.  I wasn't able to make the C more round and fancy doing it free-hand and I didn't have a stencil for it.  I also wish the gray color was lighter.  However, it was fun taking something gross and making it pretty!

I found the tray in my bathroom when I moved in my apartment.  I think it was originally plain wood and someone painted white and put down ugly contact paper.  It had then collected all the lovely residue that accumulates in bathrooms.

First, I found a good Lifetime movie to have on in the background:


Then, I scrubbed the tray like crazy with Clorox wipes and spent quite a bit of time scraping off the contact paper.


Once I got all the contact paper off and sanded it a bit, it looked like this:


I painted the bottom of the tray first so I could see if the color I chose was the right one and how many coats I'd need.


I let it dry and then used a technique I learned on Pinterest.  Put thumbtacks on the bottom of the tray so you can easily paint the sides!


Fully painted:


Then, I picked my paint colors for the decoration!


Again, I wish I'd used a much lighter gray, like the one from my frame makeover.  Maybe a lighter yellow, too.

I knew I wanted to do stripes with a C (for my first initial) on top.  I have seen gray and yellow and coral on a lot of decorator and craft blogs, so I decided to experiment.


I put painter's tape around the inside of the tray and started with yellow, since the gray stripes would go on top.  It would be easier than painting yellow on dark gray.  I put down painter's tape for the stripes and tried my best to make them evenly spaced.  


I gave up on using a ruler and just eyeballed it and started painting.


It looks like a bumblebee.  But I persevered.

I wish I had better directions for how I did my C, but I sketched it lightly in pencil freehand, and then took my Pink Melon paint and went for it.  I used a really skinny brush at first, but then switched to a stiff, angled one.


Close-up: You can see it's not perfect!


After I was done painting and it all dried, I added two coats of Mod Podge.


Here it is with a fruit bowl on it!


I decided to put it on my microwave.  I have 4 roommates and I'm slowly making my room as close to what a studio apartment is like as I can so I can feel like a grown-up lady with her own apartment.  Here's my little "kitchen area".  It's sad and wants a pretty tray.


Here you go, kitchen area!